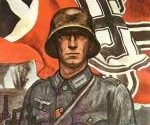
|
This is the second article in a series of articles addressing the German Helmet in WWII. This article focuses on refinishing
a helmet for reenacting.
Now that you know what kind of helmet you own, you need to consider what colour and texture you need to have on your helmet.
If you are fortunate enough to have an original, untouched lid, please, please, please do not ruin it by repainting it or
slapping some crummy repro decals or camo on it. However, if you are like many reenactors, you may have something that had
undergone some changes singe it was last held in German hands during the war. My field helmet, for example, is an M40 that
was used post war by the Dutch, which means that it was painted a funky yellow colour. That was something that needed to
be rectified.
The first thing to do is to try and figure out what colour your lid should be painted. Most war time helmets were painted
feldgrau, a dark greenish grey colour that varied wildly in shade. However, some early war helmets (especially the VERY early
war lids) were painted an apple green. The best way to figure out what colour to use is to examine originals (or photographs
of originals) and then try to mix paint to match it as much as humanly possible. I have found that you can get a colour that
matches fairly well by purchasing two shades of railroad paint, Brunswick green and Pullman green and mixing them until you
get something acceptable. If you are lucky enough to have a helmet that either still has original texture, or one that doesnt
need texturing, then you can just brush it on with a modeling brush. Just be sure to use small strokes and try to keep both
air bubbles and brush strokes from standing out
Now here comes the fun part. Throughout the war, the Germans used additives to roughen up and texture the paint on the
helmet so it wouldnt shine so much. This was good for the soldaten, but bad for the reenactor, as this is a very hard effect
to duplicate. During the war the Germans actually used aluminum oxide to achieve this effect, and it really is the only thing
that will achieve it. It can be somewhat hard to find, however, it is commonly available at lapidary and rock shops as a
polishing compound. The best thing to do is to spray a layer of paint onto the helmet and then sprinkle the powder on as
it dries. It isnt like the original method, unfortunately, as the Germans made the mixture first and painted the helmets
with it. However, it does make a fairly good effect. Again, to determine how much texture is needed, you need to look at
originals. However, I will make it easy for folks who have m35 and early m40 model helmets. Many of these (unless they were
repainted later) do not have any texturing. However, most M42 helmets, as well as later dated M40 style helmets did have
it.
Ok, so now youve got it painted and textured. What next? Well, this step is optional, however, I find that it both adds
to the life of the paint, as well as giving it a more authentic sheen& If you want, what you can do is bake your shell.
Basically, wait until the helmet is fully dry, and then set your oven at about 350, and bake it for a couple of hours.
Now you want to be careful doing this, as it does smell really bad, and you dont want to completely alienate your wife/girlfriend,
it its best to do this on a day when you can leave the door open to allow for ventilation.
Also, please make sure you have removed the liner, chinstrap, and liner band from the helmet, or you will be in for a
nasty surprise.
No that you have the paint finished, you face a choice. Do you need decals? The primary thing to consider when making
your choice is to consider what your primary impression is. If your unit is like 80% of the units out there, then you do
a generic late war impression, which runs pretty much from D-Day (June 6) 1944 to the end of the war. If you are a member
of one of these units, then your answer is simple. It would be best to have no decals. Why? Because they were against regulation.
In fact, the German Army changed their regulations regarding helmet decals twice during the war. First was the order passed
down in mid 1940 as a result of experiences in Poland and France, which required the removal of the national tricolor on the
right hand side. This was done mostly because it was noticed that the bright red colour on the shield was exceptionally effective
at drawing enemy fire. Now at this time, the shields were either painted over, scratched off, of simple left. However, the
ones that were left on were in the far minority, and would more than likely only been seen in rear echelon and garrison settings.
The second order was made in 1943, and it required the eagle on the left hand side be removed. Again, there were occasions
where it was kept (and it seems that this was done a bit more often that with the tri colour). However, again, these would
have been in the minority.
So with that in mind, decide if you want a decal. If you do decide that you want to have one, I feel, IMHO, that the
best to go with is a good quality water transfer. Heres the best way that I have found both to apply them, and to keep them
from falling off as easily.
1. First of all, go ahead and make sure that the paint is completely dry. It is best to wait at least a day or two after
putting on the final coat.
2. Make sure the helmet is good and clean. Measure where you want the decal to be (According to regulations, it is supposed
to be .5 centemeters from the top)
3. Take the decal and trim it, then put it into the water for about 30 seconds (just long enough for the decal to loosen
up. If you leave it too long, it will not stick.) Put it on the helmet and carefully maneuver it into place.
4. When it is where you want it, very carefully smooth out the bubbles under the decal.
5. Next, take a hair dryer to it. Normally I heat it on both the inside and outside of the helmet so it heats up evenly.
Take a smooth out the bubbles that rise. The helmet will get hot. *Optional* Get a bottle of decal solvent and put it
on the decal before you put it on the helmet
6. Put the helmet aside and let it dry completely
7. Mask completely around the decal (and surrounding helmet) with masking tape
8. Get a can of clear coat of lacquer and carefully paint the decal. Not only did originals have a coat of lacquer, but
it will also give an extra layer of protection.
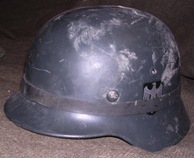
Example of a restored helmet:
The Third (and Hopefully final Article on the German Helmet in WWII covers the use Helmet camoflage during the war. It is
located in the advanced article section.
Or, you can click the following link:
*Coming Soon*
|